Slack is a ubiquitous business communication tool, but using it without a strategy to keep channels organized can lead to chaos. Lost messages and confusion over channel purposes are just a few common Slack pitfalls.
Whether you’re managing Slack for your team or the entire company, a few minutes of planning and organizing your channel strategy at the start will save time and eliminate confusion down the road. It’s easy to do, and I’ll show you how.

Organize Your Slack Channels In 4 Easy Steps
Slack is the most versatile team messaging software on the market today. It’s an easy and effective tool to make everyone’s workday more efficient. Streamlining Slack channels takes just four steps.
- Create New Slack Channels
- Set Up Slack Channels for Maximum Success
- Put the Right People in the Right Slack Channels
- Archive Old Slack Channels
Ready to become a Slack channel master? Let’s get started.
1. Create New Slack Channels
Slack comes with two public channels already created–#general and #random. By default, every member you add to Slack is automatically added to both channels. The difference between the two default channels is that members cannot leave #general, making it a great spot to share company-wide announcements.
Of course, you’ll want to add more channels to fit your business needs. There are two types of channels you can create in Slack:
- Public channels are discoverable via search and denoted with a # before the channel name. Anyone can join these channels.
- Private channels cannot be found or viewed by non-channel members, and can only be joined by invitation. If you’re a member of a private channel, you’ll see a lock icon before the channel name.
Now that you understand Slack basics, you’re ready to create your own channels. Three things are important to keep in mind when building your Slack channel strategy.
Purpose of the Channel
Every Slack channel should have a unique purpose. This helps eliminate duplicate or redundant channels.
Sometimes your channel purpose will be for entire teams to stay in contact and discuss team-wide topics. Other times, it will be for cross-team collaboration to help facilitate project work.
Also, don’t underestimate the importance of fun channels. Non-work related Slack channels are a great way to build camaraderie and help colleagues get to know each other, especially in fully remote workforces. These channels also help keep this type of chit-chat out of your business-focused channels.
Once you identify the “why” of your new Slack channel and you know a channel like it doesn’t already exist, it’s time to name it.
Naming Strategy for the Channel
A cohesive naming strategy is key, especially since every Slack member can create channels by default. Without a naming convention plan in place, your Slack channels will quickly start looking like the wild, wild west, with everyone doing their own thing.
One way to keep everyone on the same page is to use channel prefixes.
Channel name prefixes help organize channels by purpose. Here’s an example of what that strategy might look like:
- Team-based prefixes: groups members by each department in your organization; e.g. team_marketing, team_accounting
- Project-based prefixes: groups all members working on a specific project; e.g. project_website, project_webapp
- Social-based prefixes: gives people with similar outside interests a place to virtually gather and share info; e.g. fun_movies, fun_happyhour
Your prefixes will vary depending on your business, but you get the idea.
Once you have your list of approved prefixes finalized, it’s important to share your new naming strategy with everyone that needs to know about it. The easiest way to do this is to pin your list of prefixes in a channel like #general for your entire organization or a #team_ channel for smaller groups.
Here’s how to do that:
Create your Slack message, covering all the details anyone needs to name a future Slack channel. Once everything is clear, click the green arrow to share your informative masterpiece with all channel members.

You’ll next want to pin your message so it is easy to find in the channel. To do that, hover your cursor anywhere in your posted message. On the pop-up menu that is displayed, click on the three dots in the upper right corner to access More actions.

On the pop-up window that is displayed next, choose Pin to channel.

Once you’ve successfully pinned your post, your message will show with a yellow background and a notation that the post is pinned and by whom, as shown below.

Slack unfortunately doesn’t keep pinned messages at the top of the channel feed. But Slack does keep a tally of pinned messages in the channel header.
When a channel has pinned messages, you’ll see that noted below the channel name.

To see the pinned messages in the channel, just click on Pinned and the messages will appear in a new pop-up window, as shown below. When there is more than one pinned message in a channel, you’ll see all pinned messages displayed in chronological order.

Description of the Channel
Don’t stop with just a channel name. Be sure to also take advantage of Slack’s ability to include a topic and description for each channel, too. This keeps members and prospective channel members informed.
You can add this information once your channel is live by selecting the down arrow in the channel header.

You will then see the channel details screen, as shown below. Note: Only the channel creator can edit the channel name.
To add or change the topic, select Edit in the topic field.

You are then presented with a pop-up window, where you can enter the topic information. Select Save when you’re done.

Repeat this process to add or change the channel description.
2. Set Up Slack Channels For Maximum Success
Yes, you can stop after naming your new channel and giving it a topic and description. But why not do a bit more to make your new channel as successful as possible? A few additional steps will give your new channel Slack superpowers.
Include Important Files
By default, every file or image that is shared in a channel can be found in the channel details screen. So if there is a file that members need regularly, it is a good idea to share this in the channel.
You can find all shared files by accessing the channel details screen.
Select the down arrow next to the channel name.

Scroll down to the Files section at the bottom of the pop-up window to find all files shared in the channel.

Of course, members tend to share numerous files over time. As you’d expect, this list eventually becomes an unwieldy way to locate the most important files.
The good news is you can easily pin the messages that contain those important files. How to do that and how to find the files afterwards is identical to the instructions found in step one, above.
Encourage Conversation Threads
Every active channel soon contains page after page of messages. To avoid discussion confusion, encourage channel members to keep topic discussions in one place by using threads to respond to original comments within the channel.
It’s easy to do. Here’s how:
Hover your mouse over the original comment you want to respond to, then click the bubble caption icon. In this example, I want to reply to a G Suite document that has been shared.

A sidebar window will appear on the right side of your Slack screen. Type your message and click the green arrow to send it.

Channel messages that have in-thread replies display in the main channel feed as shown in the example below. Just click on the reply link and you’ll see the original comment plus all thread replies in the sidebar pop-up window.
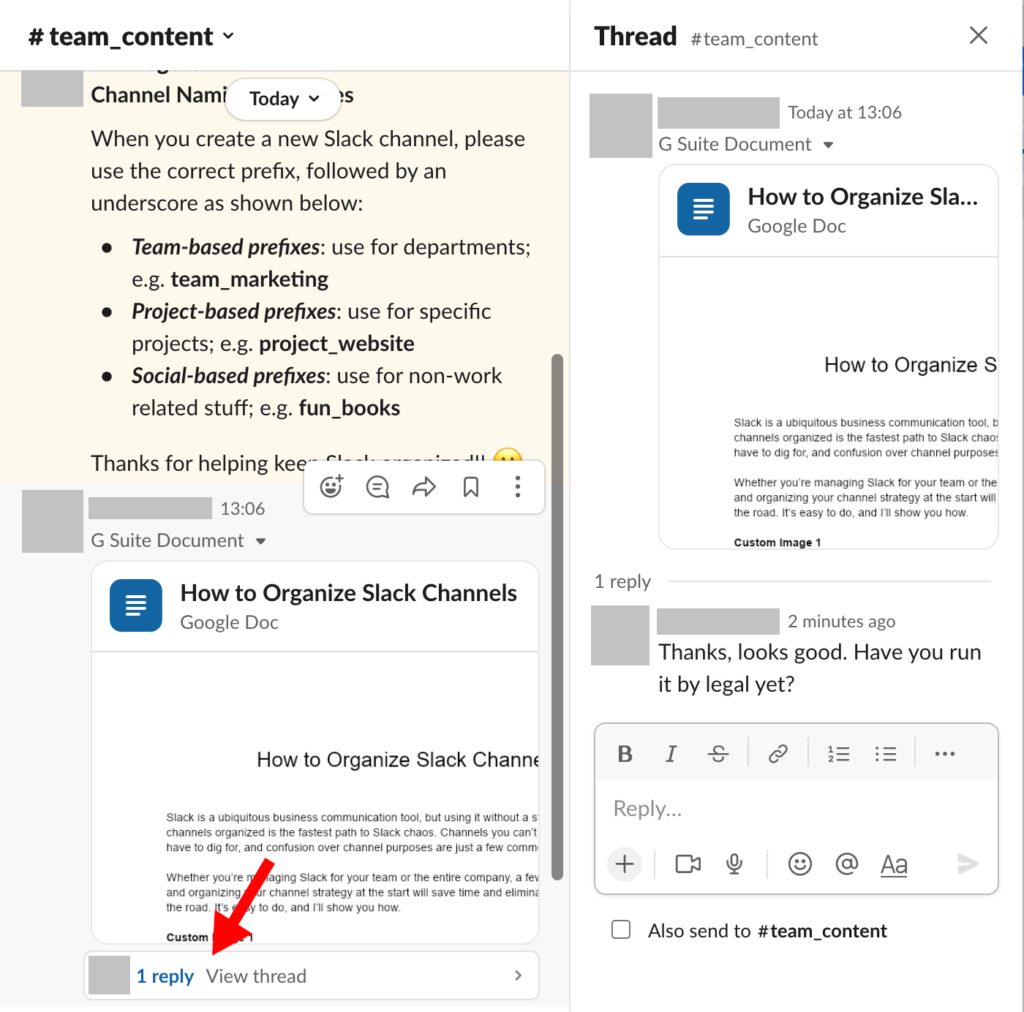
You can add to the thread directly in the sidebar window. Using this thread strategy makes it easy to locate all comments related to a single topic.
3. Put the Right People in the Right Slack Channels
You can also keep your Slack channels organized by adding only the people who need to be members of certain channels. Some channels, like #general, are mandatory for all employees, and becoming a member happens by default. All other channels must have members added when the channel is created.
There are two things to consider when managing channel membership.
Add Only Necessary Members
The key to channel success is to keep a person’s role and interests in mind when deciding whether to include them in the channel.
For example, you aren’t likely to add the company CEO to a project channel. And you aren’t going to make a senior management team channel public and open for anyone to join. So as you’re creating new channels, consider whether to make them public vs. private and only add members that make sense to be there.
To add a new member to your channel, click on the image (or cluster of images for channels with multiple members) in the upper right of the channel header to open the member window.

The member window pop-up will appear. Select Add people.

Type in the first few letters of the name of the person you want to add. You’ll see a list of possible matches. Select the person you want from that list. If you want to add more than one person at a time, just repeat this step for everyone you want to add.

Once the person’s name is displayed in the blue box with an X next to it, press Add.

That’s it! You’ve added a new member to an existing channel.
Delete Unnecessary Channel Members
As time goes by, you might want to remove members from a channel. You can view current channel members anytime by clicking on the cluster of images in the upper right corner of the channel header.

You’ll then see a pop-up window that lists all channel members. See someone that needs to go? Find the person you want to delete, and click Remove to the right of their name.
Note: If you don’t see the option to remove a member, you don’t have permission to delete members from the channel. See your Slack owner or administrator for guidance.

You will be prompted to confirm your removal action. If you’re sure, go ahead and hit Remove. Poof! The person is no longer a member of that channel.

There you go! Adding and removing members from Slack channels couldn’t be easier.
4. Archive Old Slack Channels
Some Slack channels eventually outlive their original purposes. To keep Slack streamlined and organized, archive channels when they’re no longer needed. Here’s how.
Click on the drop-down arrow next to the channel name in the channel header.

In the pop-up window, choose Settings to reveal the archive option. Choose Archive Channel for everyone.

Select Archive Channel to confirm.
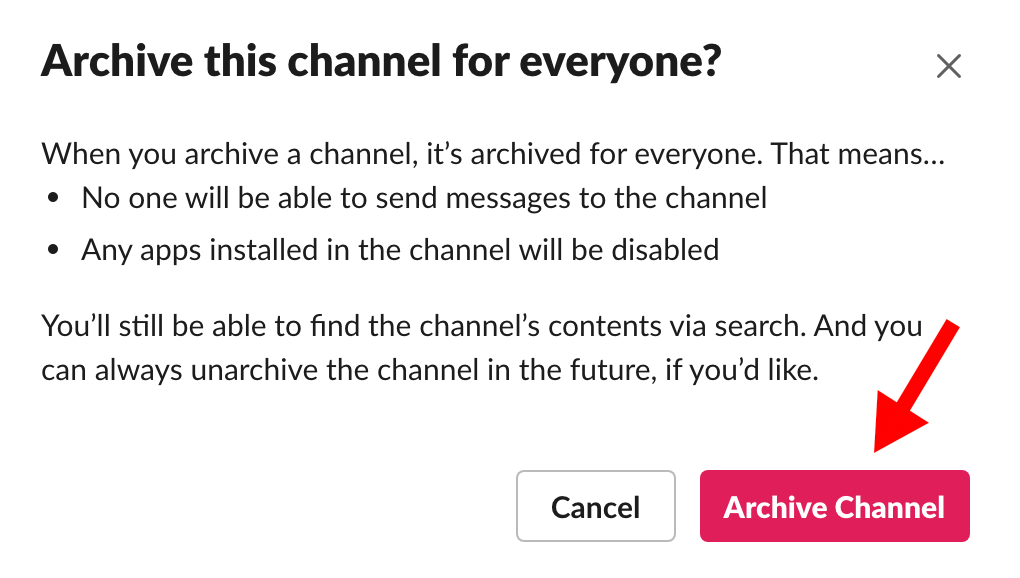
Archiving a channel rather than deleting it allows you to keep all channel history and restore the channel at a future date.
Final Thoughts About Organizing Slack Channels
Slack is a great way to keep everyone in an organization connected. Whether for teams, projects, or just for fun, people simply communicate better with Slack.
Staying organized is the best way to ensure everyone’s Slack experience is a positive one. A solid channel naming strategy, clear channel topics and descriptions, and only including members that make sense in a channel are three key strategies to keep Slack organized.