Are you considering a website redesign?
If so, you’re not alone. On average, companies redesign their websites every two to three years.
Website redesigns can help boost your search rankings, improve usability, and attract your ideal customers.
However, a poorly executed website redesign can have disastrous consequences, such as decreased web traffic and loss of revenue.
If you’re thinking about redesigning your website, there are ways to ensure your website redesign does not negatively impact your search rankings.
Before you redesign your site, make sure to read this post.
Step 1: Create Your Redesign on a Temporary URL (or a Production Server)
The first step in your website redesign process is setting up a temporary URL. This lets you test out your new design without impacting your live website.
If you’re using a CMS like WordPress, you can easily create a duplicate of your website on a different domain name or subdomain.
If you’re using a custom CMS or having your website built from scratch, you’ll want to create a subfolder on your website and install the new design there.
In the case that you are migrating to a new CMS for your website redesign, you can simply stage your website redesign on a trial server.
A temporary URL or staging site allows you to make all the changes, edits, and design tweaks you want, without impacting your customer-facing site.
If you’ve chosen to migrate to a new CMS for your redesign, the staging site can also act as a testing ground for the new functions and designs in the CMS.
Step 2: Perform an Audit Your Old Site
The next step you’ll want to take is performing a thorough website audit of your old site.
The purpose of this audit is to identify any key elements on your site that have been driving traffic, leads, and sales for your business.
This will help ensure these valuable pages are not lost in the redesign process, or worse, harmed by it.
An audit can also identify elements on your site that aren’t working, or that may be contributing to a negative user experience. For example, a recent study found 42.5 percent of websites contain broken links. A site audit should help you identify those instances.
When you identify these elements in your audit, make sure they are addressed during the redesign process and not carried over from the old site to the new one.
When performing your audit, be sure to look out for any SEO issues that exist on your current site, including:
- missing page titles
- duplicate page titles
- page titles over 512 pixels
- page titles below 200 pixels
- missing H1 tags
- duplicate H1 tags
- multiple H1 tags
- missing meta descriptions
- duplicate meta descriptions
- meta descriptions over 923 pixels
- canonical tags
- canonicalization
- broken internal/external links
- image alt text
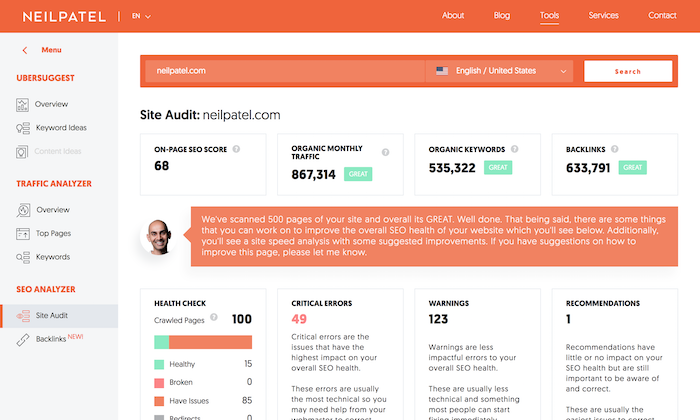
Using a website auditing tool like Ubersuggest or Screaming Frog can help you identify these and other SEO issues on your website.

Once you have a list of all the SEO issues, you can start fixing them to improve your website’s search engine rankings.
If you’re not sure how to fix an issue, reach out to an SEO expert for help.
Step 3: No Index Your Temporary/Test Site
One of the biggest mistakes people make when redesigning their website is forgetting to “no index” their test or temporary site.
No indexing tags tell search engines not to include your content in their search results.
This is important because if your website is not yet optimized for search or has major SEO issues before launching, you could lose all your hard-earned SEO rankings.
To no-index your temporary/test site from most search engines, add the following code to your website’s <head> section.
<meta name="robots" content="noindex">To no index your site from Google only, use this code:
<meta name="googlebot" content="noindex">See more options for no indexing from Google here.
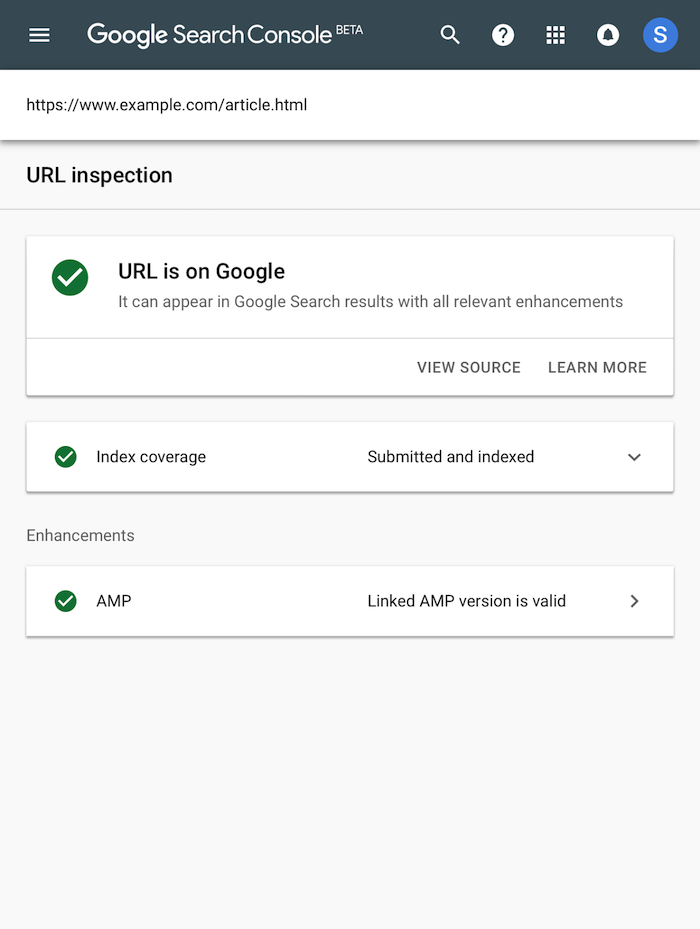
To ensure your site is not being indexed after you insert your code, request that Google recrawls the page using the URL Inspection Tool. Once the crawl is complete, check to see if your URL still shows up. If it does, you may want to restart the no-index process.

Step 4: Start Making Your Changes
Now that you have no-indexed your site, you can start making changes without worrying about tanking your SEO rankings.
As you begin your website redesign process, be sure to consider your SEO at every step.
For example, if you previously built a strong backlink profile, do you have a plan in place to maintain them during the redesign?
Or, if you are changing your existing navigation structure, do you have a plan in place for redirects?
To avoid any SEO issues in your process, take the time to plan out your website redesign in advance and consult with an experienced SEO professional.
Setting up 404 pages in advance, reviewing links from incoming websites (try this free backlink checker), and having a plan for 301 redirects will save you time and headaches in the long run.
Step 5: Test Your New Website (Crawl It Using Screaming Frog)
Once you’re happy with your new site, after all the designs, re-designs, tweaks, and changes, it’s time to give it a test drive.
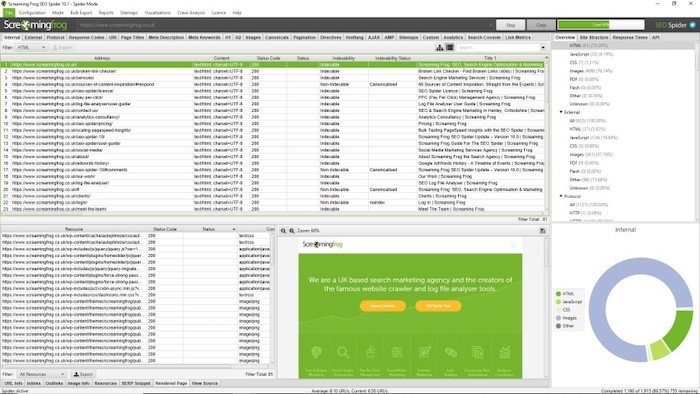
It’s a good idea to crawl your test website using Screaming Frog SEO Spider and check for any errors that may have been introduced during the redesign process.
Screaming Frog can help you find broken links within your site structure, analyze page titles and meta descriptions, audit any redirects, and discover duplicate content.
You can also use this tool to compare and track your website’s crawl budget. This means how much of your site Google is actually crawling and indexing.

Testing can take anywhere from a couple of days to a couple of weeks, depending on how strong your SEO strategy was from the start.
Just remember, never skip the testing phase!
Launching your website too early without uncovering potential bugs can lead to SERP penalties and a significant loss in organic traffic.
Step 6: Optimize Your New Site
Even with the best planning and execution, little errors will still come up in your website redesign process.
Don’t stress!
The beauty of the testing phase is you can identify and correct any problems you find before your whole website goes live.
As errors come up in your testing phase, be sure to document them so you can fix them before your launch.
Pay close attention to things like:
- page speed
- meta descriptions and titles
- target keywords
- alt text
- broken links
- re-directs
- internal linking
You’ll also want to make sure your site is optimized for mobile devices — that’s because 54 percent of all internet traffic comes from mobile devices.
All of these factors will contribute to a better overall user experience, which can help you attract more visitors and convert more leads.
Step 7: Set Up Redirects
One of the most common errors during a website redesign is forgetting to set up redirects.
Redirects are used to send users and search engines to the correct page when they try to access a page that’s been moved or deleted.
Without redirects in place, visitors might see a 404-error code (page not found), which can be frustrating and lead to them abandoning your website altogether.

Error codes happen when a page is moved or deleted and the URL is not updated accordingly.
- 401 error codes tell viewers they are unauthorized to view a page. This happens when the owner of a website uses an authorization plugin and has decided to restrict access to certain pages on their site.
- 404 error codes appear when visitors try to visit a page that no longer exists. These errors often happen due to user mistakes, such as inputting the wrong URL, but they can also be caused by website redesigns or changes in domain names.
Error codes can have negative impacts on a website’s performance. For example, past backlinks may be lost if not redirected to the appropriate page.
Another possible consequence is Google might index the error pages instead of other important content on your website.
Fortunately, there are a few things you can do to minimize the impact of these errors on your search engine rankings, such as setting up redirects.
There are three main types of intentional redirects, 302, 302, and 307.
- 301 redirects are permanent, meaning they will forward visitors and search engines to a new URL until the end of time. These are best used when you’ve changed something in your permalink structure and are never planning to use that URL again. These redirects will tell users and search engines this page is no longer available and should not be indexed.
- 302 redirects are temporary, meaning they will only redirect traffic for as long as you need them to. A 302 is commonly used when carrying out website maintenance or making small changes, or in cases when you want to use the directed URL again. When work is complete, it’s important to put your website back to its original state by deleting the 302 redirects.
- 307 redirects are also temporary but offer a bit more clarity than their 302 counterparts. 307 redirects tell viewers a URL has been moved but will be back soon. These are used when making temporary changes, such as those in a website redesign.
It is especially important to set up redirects if you are changing your URL structure during a redesign, as this can have a huge impact on SEO performance.
As well, using custom designs on your redirect pages can improve the user experience of the page.
Step 8: Map Out 301s
301 redirects are one of the most important parts of a website redesign. These are permanent redirects that tell web browsers and search engines a URL has been moved permanently to another location.
Make sure to map out your 301s before starting the website redesign process, so you know where each page is redirecting to. This will help avoid any broken links or 404 errors on your new website.
This also ensures you don’t lose any search engine rankings, traffic or backlinks to the pages on your old site.
To begin mapping out your 301s, start by identifying which pages on your old website you want to keep and which ones you want to redirect. You can use a tool like Screaming Frog or Google Analytics to help with this process.
List your pages somewhere simple, such as in an Excel sheet or Google Sheet, so you can clearly see your site structure.
Once you have your pages listed, it’s time to start creating the 301 redirects.
You can set up 301 redirects in several different ways, depending on your web host.
If you’re using a content management system (CMS), such as WordPress, some plugins can help make the process easier.
If your website is custom-built, ask your developer to create 301 redirects for the pages you’re keeping and any others you need.
Be sure to test and measure any 301 redirects you create to ensure the redirect is working correctly.
A simple way of testing this is to visit a few URLs for pages you’ve redirected to and check if they are displaying the right content.
If you have a Google Search Console account, you can also use the Crawl Stats Report to check for any broken redirects.
Once you’ve confirmed your 301 redirects are working correctly, it’s safe to proceed with your website redesign.
Step 9: Update Your Sitemaps
Updating your sitemaps is an important part of a website redesign, as it will tell search engines which pages have been changed or removed.
If you’re using a CMS like WordPress, updating your sitemap is easy—just install and activate the Yoast SEO plugin.
Yoast SEO will automatically create a sitemap for your website and update it whenever you make changes.
If you’re not using WordPress, follow these steps to update your sitemap for Google search bots:
- Generate your XML Sitemap file by using an online sitemap generator like Screaming Frog.
- Upload your sitemap.xml file to your website’s server.
- Check that your sitemap.xml file is in your server’s root folder. This is usually the same folder where you’ll find “index.php” and “.htaccess” files.
- Verify your sitemap.xml file is live. You can do this by adding the “/sitemap.xml” suffix to your website’s domain name (for example, neilpatel.com/sitemap.xml)
- Submit your new sitemap to Google through the Google Search Console.
Step 10: Remove the No Indexing (Send Your Site Live)
Before you send your website live, be sure to remove the no-index tag from your site.
This will ensure Google’s search bots will resume indexing your website’s new pages and you can begin gathering new SEO data points.
To do this, simply remove the code previously entered in your website’s head section and save your changes.
Failing to remove the no indexing code will keep your site from ranking in search.
Step 11: Double-Check Your Work
Once you’ve completed all the steps, it’s time to send your website live!
Before you hit send, be sure to double-check your work to avoid any potential issues.
It’s a good idea to show your newly redesigned website to multiple people on your team to ensure you get as many perspectives as possible.
You can also use tools like Ahrefs to check your website’s SEO performance.
If everything looks good, go ahead and hit that send button!
Don’t worry if small issues pop up after your launch, that’s totally normal.
Just be sure to continuously monitor and optimize your website in the time following your website redesign.
Frequently Asked Questions About Redesigning a Website While Protecting Search Rankings
Does website redesign impact search rankings?
Yes, a website redesign can impact your site’s search engine ranking. How much it impacts your ranking depends on how well you execute the redesign and how well your website currently performs in terms of SEO.
What is the difference between a website migration and a website redesign?
Website migration is when you move your website to a new domain, whether you are moving from “example.com” to “new-domain.com” or from “example.net” to ”new-domain.net.” Website redesign is when the structure of your website changes, but it remains on the same domain (e.g., all URLs currently point to ”example.com.”)
What are some of the potential impacts of a website redesign on SEO?
One major impact is you may lose your current rankings if you do not take steps to preserve them. Additionally, 301 redirects need to be set up properly to ensure any link equity (the value of links pointing to your website) is passed along to the new URLs. If these steps are not taken, you could experience a significant loss in traffic and organic search results.
How do I change my website without losing rank?
The best way to change your website without losing rank is by paying attention to your site structure and making sure all of your redirects are in place. As well, stopping and starting search engines from crawling your site during the website redesign phase can ensure your rankings stay the same.
Conclusion: How to Safely Redesign Your Site Without Impacting Search Results
A successful website redesign can help you transform your site and improve user experience, but it can also harm your Google rankings if done incorrectly.
We hope this guide has given you some insight into how to ensure that doesn’t happen so you can protect your search engine rankings.
Be sure to monitor your website’s search engine rankings and traffic closely in the coming weeks and months. If you notice any significant drops, reach out to a trusted developer or SEO expert to help.
What were the results of your latest website redesign? Let us know in the comments.


![Read more about the article [Funding alert] Game streaming platform Loco raises $9M by Krafton, Lumikai](https://blog.digitalsevaa.com/wp-content/uploads/2021/06/Imagee9cb-1624861821594-300x150.jpg)


![Read more about the article [Funding alert] Homingos raises undisclosed round from BITS Spark Angel Network](https://blog.digitalsevaa.com/wp-content/uploads/2021/03/Image93qi-1616769055903-300x150.jpg)
![Read more about the article [Funding Galore]$258 Mn Raised By Indian Startups This Week](https://blog.digitalsevaa.com/wp-content/uploads/2022/05/FG_23-28-May_Social-300x157.jpg)
